The Subnautica map is one of the most searched tools by players who want to understand where they are, where to go next, and how to survive longer on Planet 4546B. Subnautica does not feel like a normal open-world game where the map constantly tells you exactly what to do. Instead, the game drops you into a huge alien ocean and lets you learn by exploring, scanning, crafting, and sometimes making mistakes.
That is what makes the game special, but it is also why many players search for a Subnautica map. The ocean is beautiful, but it can be confusing. Biomes connect in strange ways. Important resources appear in specific zones. Wrecks can be hidden behind cliffs or deep underwater. Lifepods may guide you toward new areas, but they do not explain everything. Some locations are safe early in the game, while others can destroy an unprepared player in seconds.
A good Subnautica map helps you understand the world without completely ruining the adventure. You can use it to find resources, plan safe routes, locate wrecks, track lifepods, understand biome depth, and avoid entering dangerous areas too early. For new players, it can reduce frustration. For returning players, it can save time. For completionists, it can help clean up missed fragments, wrecks, and exploration goals.
Quick Subnautica Map Overview
| Map Feature | Why It Matters |
|---|---|
| Biome locations | Helps you understand different areas of the ocean |
| Resource zones | Shows where to find materials for crafting and upgrades |
| Lifepod locations | Guides story progress and early exploration |
| Wreck locations | Helps find fragments, blueprints, and useful items |
| Alien bases | Important for story progression and late-game exploration |
| Depth information | Helps you know if your equipment can handle an area |
| Creature danger zones | Helps you avoid dangerous predators |
| Coordinates | Useful for precise navigation, especially on PC |
| Cave entrances | Important for reaching hidden or deeper areas |
Why Players Need a Subnautica Map
Players usually search for “Subnautica map” after getting lost, stuck, or underprepared. Maybe they need silver ore but keep searching the wrong biome. Maybe they are trying to find Moonpool fragments. Maybe they need to reach a Lifepod but do not know how deep it is. Maybe they accidentally entered a dangerous zone and heard something huge roaring in the dark.
That is normal. Subnautica is built around discovery, but the game can be unforgiving when you explore without preparation. Oxygen, food, water, depth limits, hostile creatures, and limited storage all matter. A map helps you make smarter decisions before you leave your base.
The map is especially useful because Subnautica has vertical exploration. A location may not be on the same level as you. It could be above, below, inside a cave, behind a wreck, or under a biome entrance. Many new players get confused because they reach the right area on the surface but cannot find the actual entrance or resource below.
That is why the best Subnautica map is not just a flat image. The most useful maps include depth, biome layers, points of interest, and resource filters.
Best Ways to Use the Subnautica Map
The smartest way to use a Subnautica map is to search with a goal. Do not open a full map and try to memorize everything. That can make the game feel overwhelming and spoil the mystery. Instead, use the map when you need a specific answer.
If you need a resource, filter or search for that resource. If you need fragments, check wreck locations. If you are trying to reach a Lifepod, check depth and nearby biome danger. If you want to build a base, look for safe areas close to useful materials.
This keeps the map useful without turning exploration into homework.
| Player Goal | Best Map Use |
| Find materials | Use a resource map or biome resource list |
| Locate wrecks | Check wreck markers and nearby dangers |
| Follow story signals | Use lifepod and alien base locations carefully |
| Build a base | Look for safe biomes near resources and travel routes |
| Upgrade vehicles | Check depth zones and fragment locations |
| Avoid danger | Learn hostile creature areas before entering |
| Complete exploration | Use points of interest and biome maps |
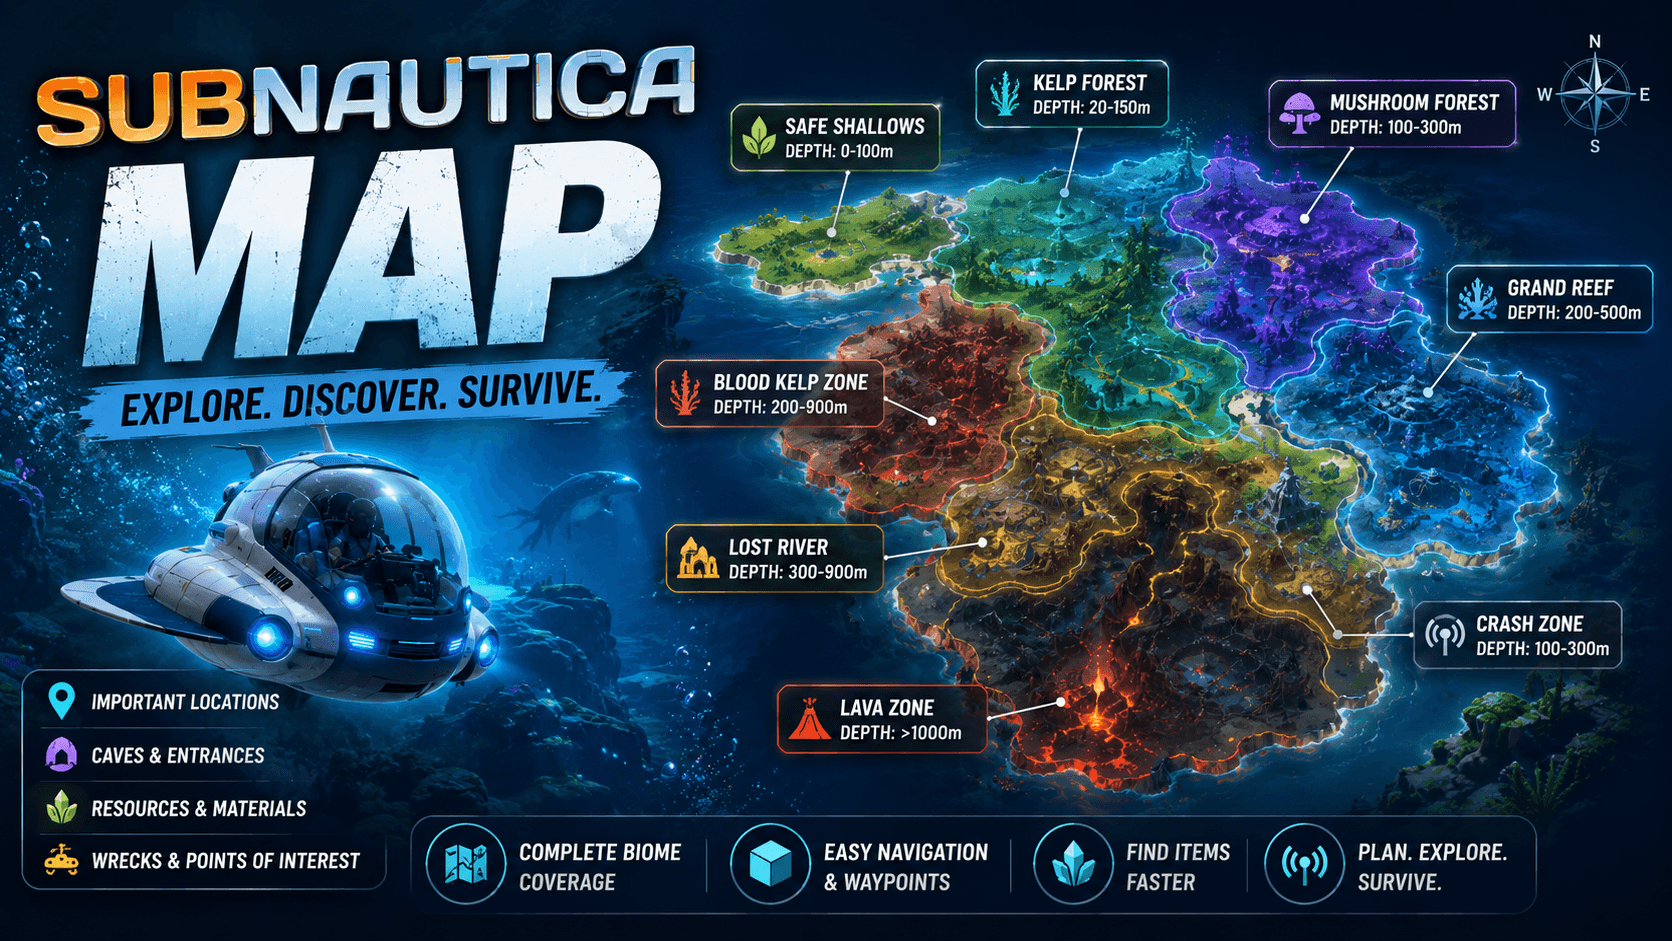
Subnautica Map Regions and Biomes
The Subnautica map is made of many biomes, and each biome has its own mood, resources, creatures, and danger level. Some biomes are bright and safe enough for early exploration. Others are dark, deep, and dangerous. The better you understand biomes, the easier the game becomes.
Early areas like the Safe Shallows, Kelp Forest, and Grassy Plateaus help you learn basic survival. These areas contain common resources and early fragments. As you explore farther, you reach deeper and more dangerous places, including caves, mushroom forests, blood kelp zones, the Lost River, and volcanic areas.
The map becomes more important as you go deeper. Early on, you can survive with basic tools and a small oxygen tank. Later, you need better vehicles, depth modules, food planning, power cells, beacons, and stronger navigation habits.
Important Subnautica Biomes Table
| Biome | General Use | Beginner Risk |
| Safe Shallows | Early resources, basic survival, starting area | Low |
| Kelp Forest | Creepvine materials, early exploration | Low to medium |
| Grassy Plateaus | Fragments, wrecks, early base options | Medium |
| Mushroom Forest | Useful fragments and resources | Medium |
| Jellyshroom Cave | Mid-game resources and story interest | Medium |
| Sparse Reef | Wrecks and safer travel routes | Medium |
| Blood Kelp Zone | Advanced resources and deeper travel | High |
| Grand Reef | Deeper exploration and important locations | High |
| Lost River | Major late-game route and resources | High |
| Inactive Lava Zone | Late-game progression and rare materials | Very high |
| Lava Lakes | Endgame exploration | Very high |
| Crater Edge | Map boundary danger zone | Extremely high |
Subnautica Resource Map: Finding Materials Faster
One of the biggest reasons players use a Subnautica map is resource hunting. The game has many materials, and not every resource appears everywhere. Copper and titanium are common early, but later you need things like magnetite, lithium, nickel, crystalline sulfur, kyanite, and other deeper materials.
A resource map helps you avoid wasting time. Instead of swimming randomly, you can check which biome contains the material you need and plan a route from your base or nearest beacon. This is especially helpful when crafting vehicle upgrades, depth modules, base parts, and late-game tools.
The best habit is to collect with purpose. Do not fill your inventory with random items every trip. Decide what you need, check the map, bring enough storage, and mark the area with a beacon if you plan to return.
Common Resource Searches
| Resource | Why Players Need It |
| Copper Ore | Wiring, electronics, batteries, basic crafting |
| Silver Ore | Wiring kits and important early technology |
| Gold | Electronics and advanced crafting |
| Lithium | Reinforcements and vehicle upgrades |
| Magnetite | Scanner room upgrades and advanced crafting |
| Ruby | Vehicle upgrades and later equipment |
| Nickel Ore | Deeper vehicle upgrades |
| Crystalline Sulfur | Advanced crafting and late-game items |
| Kyanite | Important late-game material |
| Quartz | Glass and base-building items |
| Creepvine Seed Cluster | Lubricant and early crafting |
| Gel Sack | Advanced materials and farming |
Subnautica Wreck Map: Why Wrecks Matter
Wrecks are some of the most important locations on the Subnautica map because they contain fragments, data boxes, scannable items, and useful supplies. If you want to unlock better tools, base parts, and vehicles, you need to explore wrecks.
The problem is that wrecks can be difficult to find and even harder to navigate. Some are near safe areas. Others are in dangerous biomes. Some require a laser cutter, repair tool, propulsion cannon, or better oxygen capacity. You may reach a wreck and realize you are missing the right tool to fully explore it.
A wreck map helps you decide which wrecks to visit first. It also helps you avoid going too deep too early. New players should not rush every wreck. Start with safer wrecks near early biomes, scan what you can, and return later with better equipment.
Wreck Exploration Checklist
| Item to Bring | Why It Helps |
| Scanner | Needed to scan fragments and blueprints |
| Repair Tool | Useful for certain doors and systems |
| Laser Cutter | Required for sealed doors in some wrecks |
| Seaglide | Helps move quickly inside wrecks |
| Extra oxygen tank | Gives more time in tight spaces |
| Beacon | Helps mark the wreck for return trips |
| Food and water | Useful for longer exploration |
| Vehicle nearby | Gives oxygen, storage, and safety |
Subnautica Lifepod Map: Following the Story Safely
Lifepods are one of the main ways Subnautica guides players around the map. Radio messages send you toward other crashed lifepods, and those locations often introduce new biomes, fragments, resources, and story clues.
The trick is that not every lifepod is equally safe. Some are close to early areas, while others are deeper or near dangerous creatures. If you follow every signal without checking your equipment, you may end up in trouble.
A Subnautica lifepod map helps you prepare before traveling. You can check distance, depth, biome, and possible threats. This does not mean you should spoil every story moment, but it is smart to know whether your vehicle and oxygen level can handle the trip.
Lifepod Travel Planning Table
| Before Visiting a Lifepod | Why It Matters |
| Check depth | Makes sure your vehicle or oxygen can handle it |
| Check biome | Helps estimate danger level |
| Bring a scanner | Lifepods often lead to useful fragments nearby |
| Bring a beacon | Useful if the area has resources or wrecks |
| Carry food and water | Prevents emergency return trips |
| Watch for predators | Some lifepods are near dangerous areas |
| Explore nearby | Lifepods often point toward useful zones |
Subnautica Coordinates: How Players Use Them
Coordinates are useful for players who want precise locations. Many Subnautica map guides use X, Y, and Z coordinates to mark wrecks, biomes, caves, and points of interest. This is especially helpful on PC, where players can view coordinates more easily through debug information.
For casual players, coordinates are not always necessary. Beacons, landmarks, compass directions, and biome knowledge are usually enough. But if you are stuck trying to find a specific wreck or entrance, coordinates can save a lot of time.
The important thing to remember is that coordinates can make exploration feel more technical. Some players like that. Others prefer natural discovery. Use them only when they improve your experience.
Coordinate Use Table
| Navigation Method | Best For |
| Beacons | Marking bases, wrecks, caves, and resources |
| Compass | General direction and route planning |
| Coordinates | Exact locations and hard-to-find points |
| Landmarks | Natural exploration and memory |
| Lifepod signals | Story-guided exploration |
| Scanner Room | Finding nearby resources |
Best Base Locations on the Subnautica Map
Choosing where to build a base is one of the most important decisions in Subnautica. A good base location saves travel time, keeps you safe, and gives you access to useful resources. A bad base location can make every trip annoying.
For beginners, a base near the Safe Shallows, Grassy Plateaus, or Kelp Forest edge is usually comfortable. These areas are close to early resources and not too dangerous. You can build storage, craft tools, recharge batteries, and slowly prepare for deeper exploration.
Later, many players build secondary bases near deeper zones. A forward base near the Lost River entrance or another important route can save time during late-game exploration. You do not need one giant base only. Multiple smaller bases can be more practical.
Base Location Comparison
| Base Area | Best For | Risk Level |
| Safe Shallows | First base, easy survival, early crafting | Low |
| Grassy Plateaus | Central travel and early fragments | Medium |
| Kelp Forest edge | Creepvine access and early materials | Medium |
| Mushroom Forest | Mid-game travel and resources | Medium |
| Sparse Reef | Safer access to deeper areas | Medium |
| Grand Reef | Advanced exploration | High |
| Lost River entrance | Late-game route planning | High |
| Lava Zone area | Endgame support base | Very high |
Subnautica Map Danger Zones
Not every part of the Subnautica map is equally friendly. Some areas are dangerous because of depth. Others are dangerous because of predators. Some are dangerous because they are confusing, dark, or easy to get trapped inside.
New players should be careful around deep biomes, dark caves, the Crash Zone, the Dunes, the Mountains, the Blood Kelp areas, and the Crater Edge. These places can contain serious threats or navigation problems. That does not mean you should never go there. It means you should go prepared.
Preparation usually means better oxygen, a vehicle, a compass, food, water, a repair tool, depth upgrades, and a beacon. If you are exploring a dangerous zone for the first time, do not bring your entire inventory of rare items. Travel light, scout carefully, and mark useful locations.
Danger Zone Table
| Area Type | Why It Is Risky | Best Preparation |
| Deep caves | Low oxygen and confusing exits | Seaglide, extra oxygen, beacon |
| Crash Zone | Dangerous creatures and wreckage | Vehicle, repair tool, caution |
| Dunes | Open area with major predator risk | Avoid early, use beacons |
| Blood Kelp areas | Deep, dark, and hostile | Better vehicle upgrades |
| Lost River | Deep route with late-game threats | Depth modules and supplies |
| Lava zones | Heat, depth, and late-game danger | Advanced vehicle upgrades |
| Crater Edge | Boundary zone with extreme danger | Avoid unless intentionally testing limits |
Subnautica Interactive Map vs Static Map
A static Subnautica map is useful when you want a quick overview. It helps you understand biome layout, general direction, and major locations. But an interactive map is usually better when you are searching for specific things.
Interactive maps let you filter resources, wrecks, lifepods, alien bases, caves, and points of interest. That makes them more useful for actual gameplay. Instead of staring at a crowded image, you can turn on only the markers you need.
For beginners, a static map is good for learning the shape of the world. For serious exploration, an interactive map is better.
| Map Type | Best For | Weakness |
| Static map image | Quick biome overview | Can be cluttered or incomplete |
| Interactive map | Resources, wrecks, lifepods, POIs | May spoil too much if overused |
| Wiki map | Coordinates and reference details | Can feel information-heavy |
| Video map guide | Visual route help | Slower to search |
| In-game beacons | Personal navigation | Requires manual setup |
How to Use Beacons With the Subnautica Map
Beacons are one of the best tools in Subnautica because they let you create your own map system inside the game. You can place them near bases, wrecks, cave entrances, rare resources, dangerous zones, and important story locations.
This is especially useful because external maps can show you where something is, but beacons help you find your way back in-game. A smart beacon system makes Subnautica much easier.
Use short, clear beacon names. For example, “Base 1,” “Moonpool Wreck,” “Ruby Cave,” “Lost River Entry,” or “Danger Dunes.” Do not leave every beacon with a generic name. Once you have many markers, unclear names become confusing.
Useful Beacon Names
| Beacon Name | Best Use |
| Main Base | Your first or main home base |
| Wreck A | A wreck you want to revisit |
| Cave Entry | Entrance to a cave system |
| Magnetite Zone | Resource farming spot |
| Ruby Route | Useful late-game material route |
| Lost River Entry | Important deep biome entrance |
| Safe Path | Route through a dangerous area |
| Avoid Zone | Area with high predator danger |
| Forward Base | Small base near deeper areas |
Subnautica Map Tips for Beginners
The best beginner tip is to avoid rushing into deep areas too early. Subnautica rewards curiosity, but it also punishes poor preparation. If an area feels too deep, too dark, or too dangerous, it probably means you should return later with better equipment.
Use the map to plan, not to spoil everything. If you need a resource, check where it spawns. If you need a wreck, check the biome and tools required. If you want to explore naturally, avoid looking at full story locations too early.
Also, place beacons often. Many players regret not marking important places. If you find a cave entrance, rare resource area, or wreck you cannot fully explore yet, mark it. Future you will be thankful.
Beginner Mistakes to Avoid
| Mistake | Why It Hurts | Better Habit |
| Exploring without beacons | Hard to find important places again | Carry beacons on every trip |
| Going too deep too early | Oxygen and vehicle limits become dangerous | Upgrade first, explore later |
| Ignoring wrecks | Misses fragments and blueprints | Scan every safe wreck you find |
| Not checking biome danger | Leads to sudden deaths | Learn risk level before entering |
| Carrying rare items into danger | Makes death more painful | Store valuables before risky trips |
| Using full maps too early | Spoils discovery | Search only what you need |
| Forgetting food and water | Forces early returns | Pack supplies before long trips |
Best Subnautica Map Route for New Players
A good beginner route starts simple. First, learn the Safe Shallows. Collect basic materials, craft tools, repair the Lifepod, and build early equipment. Then move toward the Kelp Forest and Grassy Plateaus. These areas give you more resources, fragments, and room to build a first base.
After that, start following lifepod signals carefully. Use the map only when you need help understanding depth or danger. Explore wrecks when you have the right tools. Build a Seamoth as soon as you can, because it changes how you travel.
Once you have better oxygen, a vehicle, and some upgrades, you can begin pushing toward deeper biomes. Do not rush the late-game areas. Subnautica is better when you grow into the map naturally.
Simple Exploration Progression Table
| Stage | Main Goal | Map Use |
| Early game | Survive, craft tools, repair Lifepod | Learn Safe Shallows and nearby biomes |
| Early-mid game | Build base and scan fragments | Find wrecks and resource zones |
| Mid game | Build Seamoth and improve travel | Plan biome routes and lifepod visits |
| Mid-late game | Upgrade depth and explore caves | Find deeper entrances and resources |
| Late game | Reach major story areas | Use coordinates and beacons carefully |
| Endgame | Complete final objectives | Use map for cleanup and missing items |
Subnautica Map for Completionists
Completionist players use the map differently from casual players. They want every important wreck, every blueprint, every major biome, every useful PDA entry, and every story location. For this kind of player, an interactive map is almost required.
The key is organization. Do not try to clear the whole map randomly. Work by region. Start with one biome, check its wrecks and points of interest, mark what you explored, and move on. This makes completion feel manageable.
Completionists should also keep notes. Some wrecks require tools you may not have at the time. Instead of forcing it, mark the wreck and return later. Subnautica is full of places that are easier to finish after upgrades.
Completionist Tracking Table
| Track This | Why It Matters |
| Wrecks visited | Helps find missed fragments |
| Tools needed | Prevents wasted trips |
| Biomes explored | Helps with full map understanding |
| Alien locations | Important for story completion |
| Rare resources | Useful for final upgrades |
| Cave entrances | Helps with deep travel routes |
| Beacon names | Keeps navigation clean |
| Unfinished locations | Makes return trips easier |
Should You Use a Subnautica Map on Your First Playthrough?
Yes, but carefully. A Subnautica map can make your first playthrough smoother, but it can also spoil the mystery if you use it too much. The best experience is a balance.
Explore naturally first. Let yourself get lost a little. Let the ocean feel unknown. That is part of the game. Then, when you are stuck, use the map to solve one problem at a time.
If you are frustrated, use the map. If you are curious and enjoying the mystery, keep exploring without it. There is no wrong way to play, but most players get the best experience by using the map as a backup tool, not a constant guide.
Final Verdict: The Best Way to Use the Subnautica Map
The Subnautica map is one of the most useful tools for players who want to survive, explore, craft, and progress without wasting hours in the wrong place. It helps with biomes, resources, wrecks, lifepods, alien bases, cave entrances, danger zones, and coordinates.
For beginners, the map is best used lightly. Search for resources, check biome danger, and mark important places with beacons. For returning players, it is a fast way to remember where things are. For completionists, an interactive map can turn a confusing ocean into a clear checklist.
The most important advice is simple: do not let the map steal the adventure. Subnautica works because the ocean feels mysterious. Use the map when you need help, but still give yourself room to discover things naturally.
If you use it that way, the Subnautica map becomes the perfect survival companion. It does not play the game for you. It simply helps you stop swimming in circles.
🔥 Related Posts

How to Unlock WWE Superstars in 2K24 Game Store

World of Warcraft: An Epic Journey Through Azeroth and Beyond

Clash Royale Decks — The Ultimate 2025 Guide

Minecraft Bedrock Edition: The Complete USA Guide for New & Returning Players

The Ultimate Guide to Friday Night Funkin Mods: New Songs, New Battles, New Worlds